I've been noticing that my bike has been feeling a little underpowered, especially at low RPM. I suspected a bad fuel mixture (as I had played with the float height when overhauling the carbs) but the spark plugs did not show any signs of overly rich or lean combustion. The Haynes, which is worth every penny of the thirty bucks or so that it costs, suggests that unsynchronized carbs can cause lagging at low RPM. Synchronization refers to the difference in air pressure between the carbs. It is important that both carbs create the same vacuum, so that both combustion chambers receive the same amount of air/fuel mixture. I was a little discouraged by this because at a glance, synchronizing the carbs seems somewhat expensive. Syncing requires a manometer to measure the pressure between the carbs and the engine and these tend to cost around $100. Turns out, there's a much cheaper solution to the problem.
For the purposes of syncing, we don't really care about the pressure in each carb, only the difference in pressure between the two (or more depending on your bike). We can construct a simple tool to help us determine the difference consisting of a sump and some vinyl tubing. The idea is to connect the test ports in both carbs to a common reservoir and see which one draws more fluid. We can adjust the balance until both carbs draw the same amount of fluid and we know that at this point the pressure is balanced.
Bill of materials:
20' of 1/4" clear vinyl tubing (I chose 1/4" because it fits snugly over the test port on my Bonneville)
1"x2"x4' cedar board
~5 zip ties
~20 staples
~1 cup automotive lubricant
Grand total: <$7.00 at Ace Hardware
The manometer is incredibly easy to make. First fold the tubing in half and zip tie together.
Then (very gently) staple the tubing to the board. Be careful not puncture the tubing - it needs to maintain a vacuum! I separated the staples by hand and hammered them into the board.
Add a few extra staples at the top where the tubes diverge.
And the finished product.
It's important to leave a lot of extra tubing. If one of the hoses disconnects, the opposite carb will suck all of the fluid into the engine. Having extra tubing will give you time to kill the engine before this can happen! I opted for motor oil as the manometer fluid because if it does get sucked into the engine, it's not the end of the world. Any high viscosity fluid will do - this will help dampen sudden changes in pressure (i.e. blipping the throttle or dropping down to idle) and make for a more stable reading. Siphon enough fluid in to allow for about 20" in play (depending on the weight of the fluid).
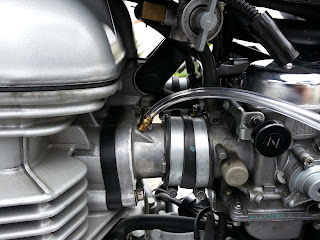
To use the manometer, attach each end of the tubing to the test port between the corresponding carburetor and intake. Make sure to connect the left hand tube to the left carb to avoid confusion. (Also, if you ever pull your carbs, make sure the rubber intake is oriented correctly when you resinstall them. Looking at this picture, I noticed that I put it in upside down...)
To sync, simply turn the bike on and watch the fluid in the tube.
If one carb is creating a harder vacuum, you'll notice the fluid level rise in that tube. Use the screw between the carbs to make the adjustment. When the fluid is level across the two tubes, you're done! Open and close the throttle a few times to make sure it's stable and you're ready to go.
A few tips:
1. Make sure that the engine is at operating temperature before syncing. This means the engine will be hot so mind your fingers when accessing the adjusting screw.
2. Increasing the idle speed a little may help, especially if the sync is way off to begin with. The "suck" cycle is longer at low revs so the pressure differential is magnified. As the sync gets closer, drop the idle for finer adjustment.
3. Gently open and close the throttle after each adjustment. The adjustment screw is on the throttle cable linkage so it's important to reset any inadvertent changes made by pressing on the screw.
4. If your bike is air-cooled be careful not to let it overheat. Without air passing over the radiator it won't take long, even at idle. You can run a fan over the radiator if the sync is taking a while.
Disclaimer: I'm not a mechanic nor am I an engineer - in fact I'm not even that technically inclined. The information on this blog is simply an account of my own experiences. You and you alone are responsible for your safety and well being. If you attempt to recreate anything you see on this blog, you do so at your risk; I am not responsible for any damage you inflict to yourself, others or your possessions. You have been warned.


